
Defensive Transition: 2-1-2 Trapping Formation
Defensive Transition can be a very poorly executed phase of a team’s defence exposing gaps for a well-drilled offense to fast break or utilise an effective primary transition against. When Defensive Transition is incorporated, it is often instilled in a very bland fashion. Normally the focus for a team in Defensive Transition is to provide a strong contest in the elements of offensive rebounding and defensive transition coverage. However, a Defensive Transition can be so much more…
Interested in more defensive trapping options? are a moment to look at FBC’s latest must read for any coaches library, the 1-2-2 Halfcourt Press E-Book.
One option that can be explored in Defensive Transition is adding a trapping element. Trapping out of Defensive Transition is one of the most effective times in which to apply pressure. Often offenses are not ready of this tactic and the passing options are limited at best. Most offensive players during this early part of the fast break or transition tend to put their heads down and do not look to be an early passing option.
The most used defensive transition formation is the Triangle and 2. This is pictured in the diagram below.
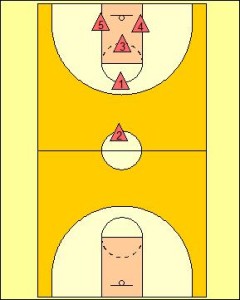
The Triangle and 2 Defensive Transition is but one option for coaches to choose from and while providing good offensive rebounding and defensive transition coverage. For this reason, other Defensive Transition formations should be explored and utilised to disrupt an offensive team’s rhythm.
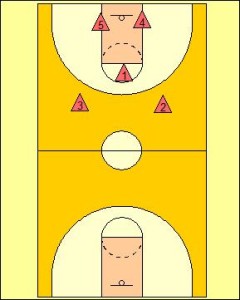
One option that exists is to implement a 2-1-2 formation. The 2-1-2 Defensive Transition is ideally balanced to not only still provide a certain amount of offensive rebounding coverage, but also provide the ability to trap the outlet player and stall the offensive teams progression, if not force a turnover.
The formation is very similar to that of a Triangle and 2 except the offensive rebounder normally on the front of the rim (One in this scenario) is pushed deeper down the floor to instead never be any closer than the foul line.
Another change in the formation is the placement of the “Safeties” being moved closer towards the three-point line. There are also two Safeties (Three and Two) instead of the one present within the Triangle and 2 Defensive Transition formation.
To reach this formation there are a number of options.
The first is to have set areas you would like players move towards. This is useful for both the rebounding and trapping players fulfilment of responsibilities. It makes sense to have Four (4) and Five (5) always move closest to the basket to compete for the rebound.
While an added advantage is that often the three quicker and more defensive capable players in the full court (One, Two and Three) can assume the trapping responsibilities.
Alternatively, a coach could drill this formation dependant on where a player finds themselves when a shot is taken and to what the closest points for them to move and fill are.
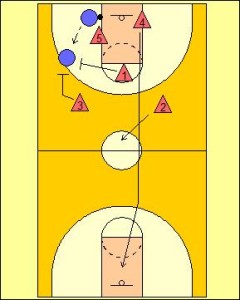
In the initial movement following a rebound and opposition securing the ball, is that it is desired for Four (4) or Five (5) to crowd this player and not allow them to dribble or make an extended long pass. Instead, the preferred option is for the outlet pass to be made to a player who is at the foul line or further towards the baseline.
The interior player not involved in defending the rebounder (Four) will commence their movement down the middle lane to finish on the front of the rim to protect the basket.
From this position, the long rebounder (One) and the safety side on which the ball has been passed (Three) will initiate the trap.
As the trap is initiated, the weak side safety moves across the split line to defend the closest pass out of the trapping situation.
Once the outlet has been made the defender of the rebounder (Five) also retreats down the middle lane to assume a long help defence position within the keyway.
This is the suggested initial rotation and player movement but there is one important progression that can be worked towards.
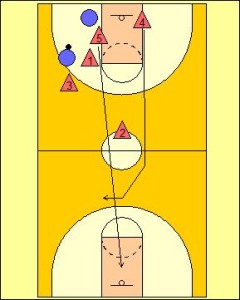
Once the players become familiar and comfortable with their movements in the 2-1-2 Defensive Transition then rotations between the two interior players (Four and Five) can be altered.
The additional rotation rule which can be incorporated is that the first defender over halfway assumes sideline defending position. This player (Four) once crossing halfway moves to defend the same sideline the outlet by the offensive team has been made to. In this way Two (2) and Four (4) will now defend these areas similar to most other standard trapping formations and deny the offensive targets one pass away from the ball handler. This will help to stifle the offense further.
The defender who was matching up with the rebounder (Five) will now once the ball has been passed for the outlet make a sprint down the middle lane of the floor to the foul line and provide the extend defensive coverage.
This change in rotation of course provides a weaker long pass coverage initially, but as a result will resemble a standard zone press defence and be highly effective against any number of teams.
A team’s defensive transition can be formatted into a number of different zone defense options. One of these options is the 1-2-2 Halfcourt Press. Have a look at FBC’s 1-2-2 Halfcourt Press E-book to better understand how the mechanics of this strategy could be implemented.
Related articles


Share this:

Coach Riches has been working within the sport, business and education industries for many years. During this time he has built an extensive number of formal and informal qualifications. A firm believer in training and development designed to help people reach their full potential, relevant o their needs and functional to their industry environment.