
1-4 Offense: Kentucky Turn Out
The 1-4 Offense: Kentucky Turn Out Play provides some opportunities early for quick scoring offense while still allowing for a standard offensive flow to happen. As always with 1-4 Offense sees the defence pulled away from the basket and having to play higher in the half court or risk offensive players being left open for long-range shots.
The 1-4 Offense: Kentucky Turn Out Play works very well against an overly aggressive defensive team as it allows for the offensive players to utilise some of their interior team mates as interference when trying to receive the ball.
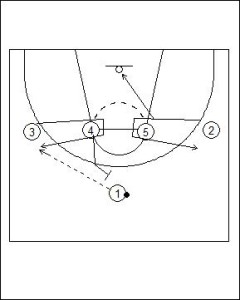
As pictured in the Diagram above the Kentucky Turn Out Play starts with the wing players moving in and around their elbow positioned counterparts. This seems like a very simple movement, but if executed well can be very effective for a number of reasons.
Firstly, as mentioned earlier this movement provides great help for an offensive player who is being guarded closely. Within this movement, though there is a valuable read for the offensive player to make.
In pressure situations, the defensive player will often position themselves up and in. This means they are up the passing lane and into the offensive player’s cylinder. As the lead is being created by the offensive player if they find the defensive player stays high to deny the direct passing opportunity and does not relocate to under to line of the cut so they are between the basket and the offensive player. Then the offensive player can bump the defender on the screener and backdoor cut to the basket looking for the lob pass (Two).
If this does not happen then the play continues with the Point Guard (One) making a pass to either wing.
The now strong side elbow steps to set a screen on the three-point line.
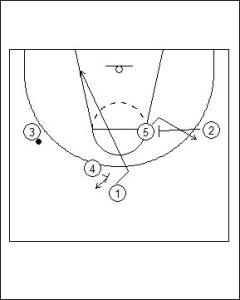
One (1) can either go over the screen so they are ball side or cut directly to the basket down the split line.
If the offensive player (One) is not likely to receive the pass on their cut to the basket, then the cutter should flare towards the end of the cut so they finish in the strong side low post.
This cut is very effective if executed well for One (1) to work themselves free of their defender.
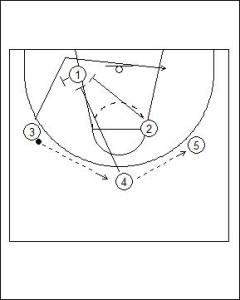
Two (2) moves from the wing to set a back screen of the weak side elbow player (Five).
After One (1) has utilised the screen Four (4) pops to the perimeter.
Five (5) also moves to the perimeter.
Scoring Options
- It is worth noting that as One (1) and Four (4) are involved in the screen and cut action; there will be only one defender below the foul line on the strong side of the floor. This is a very good isolation situation for Three (3), but this will only be the case for a count of one to two before One (1) cuts into this space and drags their defender to the basket
- One (1) on cut to the basket
- Four (3) on the step out to the three-point line
Three (3) now reverses the ball back to Four (4) who then quickly passes the ball onto Five (5). This quick movement of the ball should see defenders having to make large adjustments to their positioning. All of which will be to the advantage of the offensive players who can attack the basket when their defender is head turning to see where the ball is.
One (1) steps out of the low post and sets a Flex Screen for Three (3). Three (3) cuts at full pace looking to seal their defender on their back as they enter the keyway. If this is not possible Three (3) will finish their cut at the strong side low post.
Four (4) and Two (2) move to set a staggered screen for One (1).
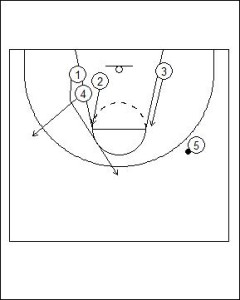
One (1) looks to create a scoring opportunity by lifting off the staggered screen.
If not successful, the offensive players relocate back to positions where the 1-4 Offense Kentucky Turn Out Play can be run again.
A difference is this time the Guards will be in the interior positions, while the Forwards will be on the perimeter.
If of course a shorter shot clock is in play a team would transition to a terminal half-court offense to finish the phase of play.
The 1-4 Offense Kentucky Turn Out Play is a very useful tool in the bag of tricks a team can utilise. If the Kentucky Turn Out is partnered with other 1-4 Offense plays then this can be a highly effective change-up play for a team to throw in an upset their oppositions rhythm.
Related articles


Share this:

Coach Riches has been working within the sport, business and education industries for many years. During this time he has built an extensive number of formal and informal qualifications. A firm believer in training and development designed to help people reach their full potential, relevant o their needs and functional to their industry environment.