
Zone Offense: 4-1 Weak Side Flash
A good Zone Offense can be worth its weight in gold for team if they are able to utilise the play to perfection and therefore change the tactics of the opposition they are facing. The 4-1 Weak Side Flash Zone Offense brings a number of different elements to the floor.
The 4-1 Weak Side Flash Zone Offense is effective against either 2-3, 3-2 and 1-2-2 half court Zone Defences. In all situations, the initial cuts and interior player’s moves can be slightly adjusted to facilitate the generation of offense when facing the different alignments. When playing against a zone defence however and utilising a set play, it is important that all players remain disciplined and focused on the task at hand. If either of these aspects wain then the ability to find the best scoring opportunity will be compromised.
The most significant aspects of the 4-1 Weak Side Flash Zone Offense play together to create advantages in the play that lead to the best scoring opportunities. The first element is the overloading of the strong side of the floor. This is very effective against a zone as it engages all players within the proximity of the ball are forced to defend, and therefore have a role that takes them away from a strong help defence position.
The second element of the 4-1 Weak Side Flash Zone Offense is the weak side flash into an interior target position. The initial cut starts on the weak side of the floor meaning the defenders must be very active in monitoring the path of the offensive player. The offensive player then moves into a post position which sees all five offensive players on one side of the floor. The defensive team will need either to adjust their rotations or risk one or some of the offensive players being free to receive an unpressured, uncontested pass to within ten feet of the basket.
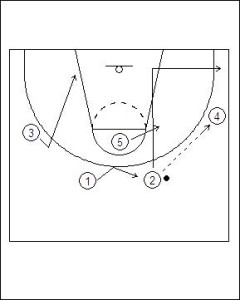
The starting formation for the Zone Offense is four out and one in. The wing players should start just below the foul line extended to trigger the bottom position rotation within the zone defence.
Two (2) begins the attack with a pass to Four (4).
Two (2) then cuts down the lane and out into the ball side long corner. If two finds that their defender is behind them as the move below the foul line the cut to the basket can be changed to that of attacking the basket.
In situations where this zone offense is facing a 3-2 Zone Defence then Two’s (2) cut should finish with the player behind the strong side low post player.
Five (5) moves from the split line to just above the foul line outside the keyway, over to the ball side high post position.
One (1) fills Two’s (2) vacated spot and Three (3) angles down toward the basket on the offside.
As soon as Two (2) has moved from the ball side low post to the ball side long corner, Five (5) rolls from the high post to the low post.
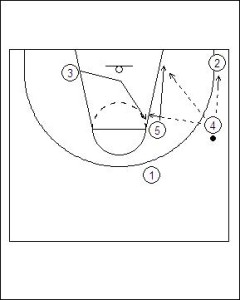
Four (4) must be very active in looking for early passes to the interior targets as they are moving rather then passing to stationary targets.
Three (3) immediately comes across the lane to the mid-post area on ball side. Three (3) should ensure they do not move in a straight line, but rather make a two-angled cut to the high post. This will limit the proactive behaviour that defenders can demonstrate in anticipating the offensive player’s movement.
If the pass is made into either three (3) or Five (5), then the opposite post player should flash to the basket.
If either interior player receives a pass then all other offensive players should look to move and relocate off the ball so to provide pressure release options from the post outward.
If no pass is available to Two (2), Three (3) or Five (5) then Four (4) can initiate the ball reversal by passing to One (1) who will be elbow extended.
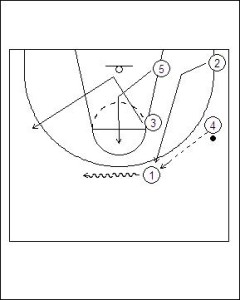
When facing a zone defence it is worthwhile noting that a pass fake will shift defenders to create a passing lane as much as dribbling or player movement in general.
One (1) dribbles from one elbow extended to the other. This movement should only entail two dribbles at the most and One (1) should finish in a jump stop so pivoting in either direction is possible.
Three (3 goes to the wing position on that side, 5 comes) v-cuts to the vacant wing position on the weak side of the floor.
Five (5) waits for three (3) to make the initial movement towards the basket and then as Three (3) moves to the wing five (5) then starts the flash back to the middle high position above the foul line.
Two (2) moves from the weak side long corner to the weak side elbow extended.
Four (4) remains stationary.
The 4-1 Weak Side Flash Zone Offense then starts again on the opposite side of the floor.
Related articles


Share this:

Coach Riches has been working within the sport, business and education industries for many years. During this time he has built an extensive number of formal and informal qualifications. A firm believer in training and development designed to help people reach their full potential, relevant o their needs and functional to their industry environment.