
2-1-2 Zone Defence
The 2-1-2 Zone Defence is a common formation seen on many basketball courts across the globe. The 2-1-2 Zone Defence provides invaluable support to perimeter players with a defensive player always positioned in a strong help position.
The 2-1-2 Zone Defence is a fantastic choice if your team has a good shot blocker or you are playing against an offensive team that looks to run players through the middle of the keyway.
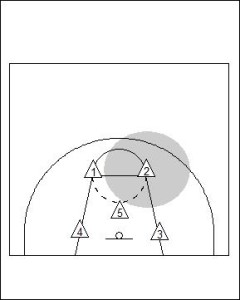
A key feature of the 2-1-2 Zone Defence is the Five (5) locking down the centre of the keyway. This player is in a fantastic position to help the other four defenders in any position.
The 2-1-2 Zone Defence is very good against a two guard faced offense or an offense that looks to exploit the middle of the keyway. Against offences that look to spread the baseline players the 2-1-2 Zone Defence is less effective and will require significant rotations to cover receiver spots.
In instances where the offense looks to spread the baseline players a 2-3 Zone is a better option, but allow the middle player in the base of the zone to float higher than the two players on either side.
Like with all zone defences each player has a defined area they are responsible for defending, called a zone. In the diagram above Two’s (2) zone has been shaded to indicate the area the player must defend which in the 2-1-2 Zone Defence.
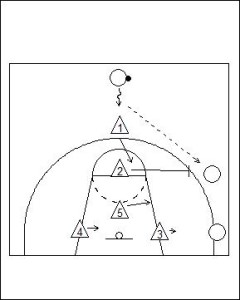
Because of the normal positioning of the players the 2-1-2 Zone Defence will need to have specific rules for initially guarding an offense that has a player filling the point position.
The take some of the confusion out of this situation, one possible option is to have the players in the top of the 2-1-2 Zone Defence (One and Two) start in an “i formation” initially when guarding a ball as it comes into the half court.
This will allow the top player (One) to guard the ball handler and then on the first pass to either wing (Two) will defend the ball.
The top players will then fall into the standard 2-1-2 Zone Defence positioning.
As the strong side is initiated the Five (5) moves to the edge of the keyway. This is an important movement and position. Five (5) should look to be in an open stance facing the ball handler. Five (5) must maintain a good defensive stance with arms extended, this will make an entry pass into a target within the keyway very difficult.
The players at the bottom of the 2-1-2 Zone Defence (Three and Four) will rotate towards the strong side of the floor as the ball is in the air.
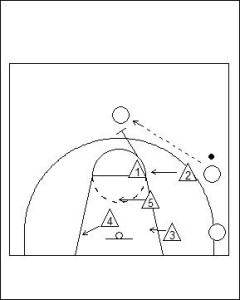
If the ball was reversed back to the Point Position then One (1) would move to guard the ball and Two (2) would fall in behind to guard the next pass in either direction.
All other players within the 2-1-2 Zone Defence rotate back to their initial starting positions.
In the 2-1-2 Zone Defence the on-ball defenders can be slightly more aggressive in their approach to guarding the ball as they will always have the Five (5) player in a very short help position.
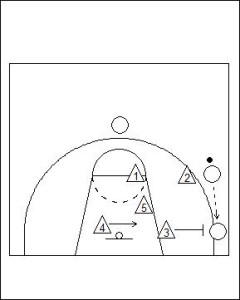
In the diagram, if the ball is passed to the long corner there is a choice to be made about the playing position of Two (2). Two (2) can either remain guarding the player in the wing position or push back towards the high post. In turn, this rotation would enable One (1) to move back ready for a skip pass or quick ball reversal.
With Five (5) in such a strong help position it is advised to have Two (2) remain on the wing offensive player. Ultimately, this will be determined by how the offense is rotating and their style of play.
Related articles


Share this:

Coach Riches has been working within the sport, business and education industries for many years. During this time he has built an extensive number of formal and informal qualifications. A firm believer in training and development designed to help people reach their full potential, relevant o their needs and functional to their industry environment.
Leave a Reply