
2-3 Zone Defence
The 2-3 Zone Defence is one of the more utilised zone defences available in basketball. Most coaches at some time in their coaching career have used the defence in passing or as a regular staple. There is a current trend within basketball coaching to utilise match-up zone philosophies and many of these start with the fundamental formation of the 2-3 Zone Defence.
A zone defence allows players to be allocated a specific area on the floor upon which they are held accountable for guarding when the ball within this space. This area also identifies a players coverage when rotating in help defence off the ball. For the 2-3 Zone Defence to be effective there are a number of technical and tactical points that should be focused upon during the defences implementation and review:
Players must maintain vision; each defensive player when in a help defence position must see the ball and the players within their area. To do this all defensive players should keep their head on a swivel so they can see any offensive adjustments such as flash cuts and offensive players movement in general.
Defensive players must carry their hands; to clog the passing lanes and provide the illusion of no space for the offense to attack each defender must have the arms extended and ready to deflect a pass. This illusion will deter some offences before they even start to drive into the keyway and cause issues with the defence condensing too far.
Players should remain in a low athletic stance; at all stages the defensive players off the ball should be in a low defensive stance ready to explosively assist in help defence or jump to deflect a pass that is attempted overhead.
Movement should be made often to reduce close-out distance; the 2-3 Zone Defence works most efficiently when players move often into strong help positions, this in turn reduces the distance then required to move in covering an offensive player one pass away from the ball. The defensive player should arrive as the offensive player receives the pass. This will assist in limiting the options presented to the offensive player with the ball.
Another key element which should be reflected upon by a coach is the guarding of passes into the keyway. There are many options within the rotations of the 2-3 Zone to deal with passes into the posts. However, the most desire situation is to not allow a pass into the keyway (especially uncontested). Defensive players should work hard to always have a hand in the passing lane between the interior targets and the ball making any pass a risky proposition for the offensive players.
The 2-3 Zone Defence is a fundamental defence for many teams.
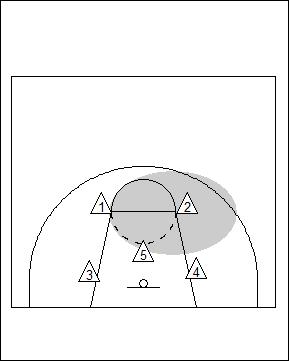
A zone defence looks to allocate an area to each individual player to be responsible for. An example of the area of responsibility can be seen in the shaded area around Two (2). Any offensive players within this area are the responsibility of Two (2) guard.
All players within the 2-3 Zone Defence have a similar area of responsibility. A player with the ball in each of the player’s areas will be their responsibility to match-up and guard.
The area that is shaded represents the full range of possible movement by each individual player.
If the ball is within this shaded area then the responsible player will be match-up with the offensive player.
If the ball is in another player’s area, this will affect every defensive player’s position off the ball within their respective shaded area.
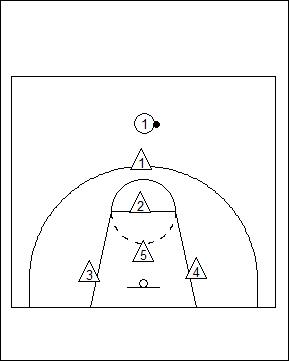
The 2-3 Zone Defence matches up well against a two-guard fronted offense. However, when facing an odd faced offensive alignment there will need to be some changes to no confusion between the guards at the top of the zone (One and Two).
To adjust to this the 2-3 Zone Defence can have the initial alignment changed so the guard positions (One and Two) are in an i-formation.
In this situation, the top player (One) will initially guard the ball handler in the point position.
Two (2) will move to either side following the pass.
Upon this movement by Two (2), One will then retreat along the split line until reaching the foul line.
If the ball is rotated by the offence back to the point position then the player in the help position will rotate to guard the ball.
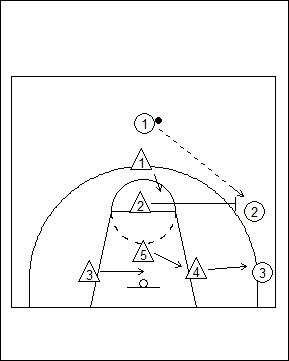
In the diagram above the ball is passed to the wing and Two (2) rotates to guard the ball.
One (1) rotates down the split line moving slightly towards the strong side high post area.
The bottom players upon the pass being initiated to the wing (Offensive Player Two) move to over load the strong side of the floor.
Four (4) should move towards the player in the long corner (Three). However, depending on the philosophy of the defence this player can either be denied or shadowed upon the rotation of the ball to one pass away.
The space vacated by Four (4) is replaced by Five (5) and Three (3) also shifts across the keyway to cover the now vacant position on the rim.
If there is no player in the long corner the bottom players within the 2-3 Zone Defence do not have to shift across as far to the strong side of the floor. Instead, Four would move into a stronger help position slightly behind Two (2).

On the pass to the long corner (Three) the 2-3 Zone Defence shifts fully to the strong side of the floor position as a diagrammed.
In this scenario Two (2) has an option of jumping to the ball and falling back behind the defender guarding the long corner (Four). Alternatively, Two (2) can deny the pass back from Three (3). This has the ability to isolate the player in the corner and forcing the rotation of the ball only from a long high pass out of this position. This will provide many opportunities of an interception by the defenders off the ball.
The strength of the 2-3 Zone Defence is in maintaining the shape of the defence. Secondly, players should try to maintain their spacing between one another. This will allow for maximum density of defenders per square metre of the court.
The 2-3 Zone Defence will reply on strong and early help defence so players must be active in supporting one another off the ball and making the offense feel as though there are no gaps to drive or find a shot from inside the three-point line.
Related articles


Share this:

Coach Riches has been working within the sport, business and education industries for many years. During this time he has built an extensive number of formal and informal qualifications. A firm believer in training and development designed to help people reach their full potential, relevant o their needs and functional to their industry environment.
Leave a Reply