
1-3-1 Zone Defence
The 1-3-1 Zone Defence is one of the more common zone defences a coach will come across. As a defence the 1-3-1 Zone Defence focuses on bring a number of defensive players around the top of the keyway. This makes the 1-3-1 Zone Defence very effective either against zone offenses which look to penetrate through the top of the keyway, or have a strong focus on high post targets.
The 1-3-1 Zone Defence has some benefits as a defensive tactic. The first of which is it allows for the Center (Five) to remain in a strong help position at all times. The five (5) within the rotations is always in the second line of the defence that allows them to make decisions based upon what is happening after the initial movement by the offense. This means the Center has time to evaluate what is happening, not as the movement is happening which allows better defensive choices to be made and overall lead to defence that is more effective.
Secondly, the 1-3-1 Zone Defence helps if an opposition is looking for high to low passing options to break down the zone. This is a very common practice for zone offenses to target this area of the court when facing 2-3, 1-2-2 or 3-2 Zone Defences. The 1-3-1 Zone Defence looks to limit these scoring tactics by placing an additional player (Five/Center) in this area to help limit the possibility of this happening.

The 1-3-1 Zone Defence is another variation commonly used by coaches and teams. The 1-3-1 Zone Defence formation provides better coverage around the foul line and elbow areas of the quarter court.
The 1-3-1 Zone Defence also provides a very effective starting position for teams in rebounding situations with players Three (3), Five (5) and Two (2) in an ideal position to crash the boards.
The 1-3-1 Zone Defence formation is position match-up best suited to odd faced offenses. These offenses might have a set-up like 3 Out and 2 In.
As with all Zone Defences the players within the 1-3-1 Zone Defence are responsible for an area immediately around them. This area has been indicated by the grey area around One (1) in the diagram.
Form the depiction you will be able to imagine the most highly contested area defensively will be around the foul line and elbow areas of the quarter court. This is especially useful if the offensive opposition has a high post that operates in their zone offense.
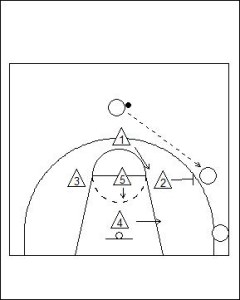
One (1) at the top of the 1-3-1 Zone Defence will engage with the offensive player in the Point Position. In this position, One (1) should look to contain and never be beaten, allowing two players to be guarding the ball.
The player at the top of the 1-3-1 Zone Defence must be defensively sound and able to contain a dribbler for three dribbles. This will be enough to push the player into another area of the guard rotation and another defensive player’s guarding responsibilities.
If One (1) is not able to contain a dribbler for three dribbles (slides) then this will result in one of the wing defenders (Three or Two) needing to assist, which will create an overlap from the start.
The defensive players must keep their formation tight for the 1-3-1 Zone Defence to be effective. If the wing players extend to far towards the three-point line then the passing opportunities will increase greatly for the offensive team into the high post area of the keyway.
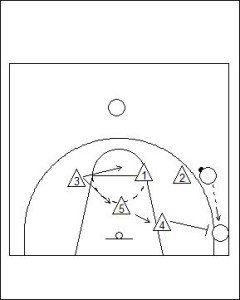
The offensive player on the wing is engaged by the closest defensive player (Two).
One (1) moves from the guarding at the top of the key to slipping in behind the on-ball defender who has moved to the three-point line to guard the perimeter offensive player closer.
As the ball is passed to the wing Five (5) has the option of dropping to the front of the rim and maintaining good interior defensive positioning ready to help as needed.
The bottom player (Four) within the 1-3-1 Zone Defence as the strong side of the floor is initiated should move in the corresponding low post. As a pass is made into the long corner this player then moves to guard the player in this position.
The weak side wing player (Three) has a number of options. Either this player can move along the foul line to take a position at the split line or they can sink into a lower help position pushing Five (5) lower.
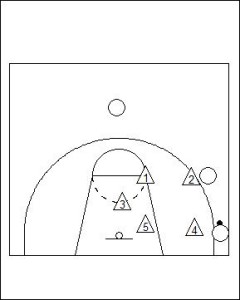
Once the ball is passed into the long corner the 1-3-1 Zone Defence formation has now changed slightly, but still offers great coverage and defensive positioning.
An option within the 1-3-1 Zone Defence is for the wing player one pass away (Two) to move back to the elbow and bump up One (1).
However, by having Two (2) remain in this position the ball will not be able to reversed through this position. This ensures a slow long pass back to the top of the key, which in turn increases the chances of deflection or stealing opportunities.
Related articles


Share this:

Coach Riches has been working within the sport, business and education industries for many years. During this time he has built an extensive number of formal and informal qualifications. A firm believer in training and development designed to help people reach their full potential, relevant o their needs and functional to their industry environment.
Leave a Reply